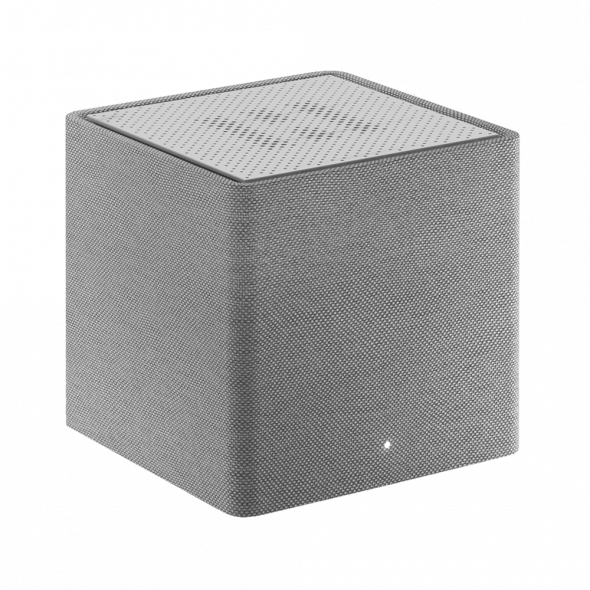


Getting started with your CX20
Welcome to the CX20 Quick Start Guide! This guide is designed to help you set up and optimize your CX20 device effortlessly. Whether you’re connecting your device as a simple access point, expanding your network with additional nodes, or configuring advanced gateway settings, we’ve got you covered.
To ensure a smooth setup experience, please follow the step-by-step instructions carefully. Each section is tailored to different needs, from basic installation to troubleshooting common issues. By the end of this guide, your CX20 device will be fully operational, providing a reliable and efficient Wi-Fi network for your home or office.
If you’re ready, let’s begin by setting up your CX20 for the best performance!
1. What’s in the box
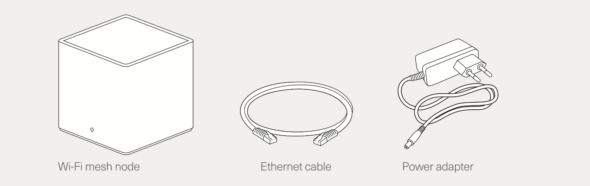
Overview
2. Simple Access Point Setup (Initial Setup)
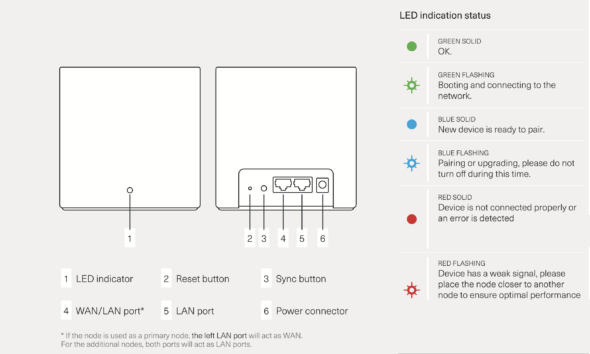
Step 1: Power on the device without a cable connected
The CX20 will power on and display a solid BLUE LED after approximately 4–5 minutes.
Step 2: Connect to the home network
Plug the WAN port (4) into your network/router directly or via a switch.
After 2 minutes, the device will restart, and the LED will turn solid GREEN.
Step 3: Placement for optimal Wi-Fi
Position the CX20 in an area that ensures strong Wi-Fi coverage for your home or office.
Step 4: Connect to your CX20
Use the QR code or the Wi-Fi password located on the device label to connect to your router/node
3. Adding Additional CX20 Nodes
Step 1: Temporary Placement
Place the new Mesh node near the main CX20 node (1–5 meters apart in the same room), or connect it using a cable (refer to Step 4 for wired pairing).
Step 2: Power Up
Plug the new node into a power outlet.
Step 3: Wireless Pairing
Press the sync button (3) on both the master node and the new node.
Wait for both nodes to display a solid GREEN LED, indicating successful pairing.
You can now disconnect the new node and move it to its final location and reconnect it to power. We recommend you place the additional node where there is still coverage from the main node to ensure good communication between the master and secondary node.
Check the LED status:
Solid GREEN: The signal is strong.
Flashing or solid RED: Move the node closer to the master node for better performance.
Step 4: Pairing with a LAN Cable (Optional)
Connect the new node to the same network as the master node using an Ethernet cable (either directly to the node or through a switch).
Wait for both the master and new node LEDs to turn solid GREEN.
That’s it! Enjoy enhanced Wi-Fi coverage with your new CX20 node.
4. Advanced Gateway Setup
Option 1: Switching to Gateway Mode (L3)
If the CX20 is already set up as an access point:
The device will restart and must be connected to the network via the WAN port, directly to the router.
To enable Gateway Mode (L3), press and hold the SYNC button (3) for 30 seconds.
The CX20 master node can connect wirelessly to CX20 slave nodes (refer to Chapter 3).
Alternatively, the CX20 can connect via a cable to a LAN switch, which can also connect to the CX20 slave nodes (refer to Chapter 3).
Option 2: Connecting to a Bridge or ONT (Public IP)
Ensure the CX20 is reset to its default settings and displays a solid BLUE LED.
Connect the WAN port directly to the bridge or ONT. The CX20 will switch to Gateway Mode (L3) and restart.
After approximately 2 minutes, the device will restart, and the LED will turn solid GREEN.
Troubleshooting Guide & F.A.Q
Differences Between Access Point Mode and Gateway Mode
Access Point Mode (L2): The CX20 extends your existing network by creating a wireless connection. It relies on your main router for IP address management and internet access.
Gateway Mode (L3): The CX20 acts as the primary router, managing IP addresses and connecting directly to your modem, bridge, or ONT for internet access.
Choose the mode based on whether the CX20 is extending a network (Access Point) or creating a new one (Gateway).
Master CX20 Node Not Showing a Solid GREEN LED
Action: Verify the cable connection to your network/router. If the issue persists, reset the device to its default settings by pressing and holding the reset button (2) for 10 seconds.
CX20 Node Blinking BLUE
Action: This indicates that an update is in progress. Please wait for the device to complete the update and display a solid GREEN LED. Note that the device may restart during the update, please do not disconnect the device during this process.
Master Node Showing Solid GREEN, Slave Node Showing Solid BLUE After EasyMesh Pairing
Action: Reset the slave node to its default settings by holding the reset button (2) for 10 seconds.
Place the master and slave nodes 1–5 meters apart, in clear view of each other, and pair them again. Wait until both nodes show a solid GREEN LED.
Slave Node Shows Solid GREEN After Pairing but Turns Solid RED or Alternates Between GREEN and RED When Moved
Action: Move the slave node closer to the master node and wait for it to stabilize with a solid GREEN LED.
For persistent issues, reset the device(s) to their default settings by holding the reset button (2) for 10 seconds.
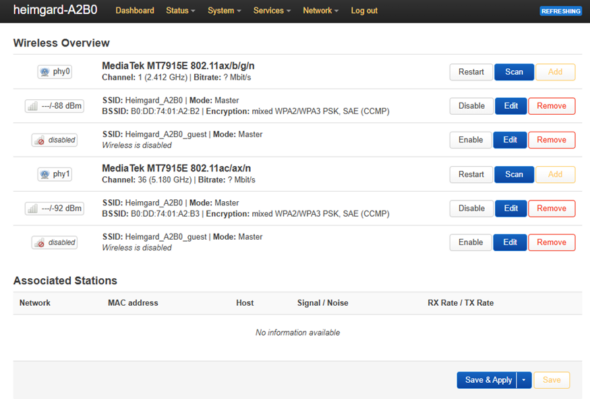
5. Graphical User Interface (GUI)
Note: The GUI enables advanced device configuration. This chapter provides an overview of the main functions. For additional details, consult online resources about the “LUCI GUI” in “OpenWRT.”
Accessing the GUI
To access the GUI, use a web browser on a client device connected to the master CX20 node, and open one of the following URLs:
http://heimgard.lan
http://heimgard-xxxx.lan
http://heimgard-xxxx (where “xxxx” are the last 4 characters of the SSID, as printed on the label).
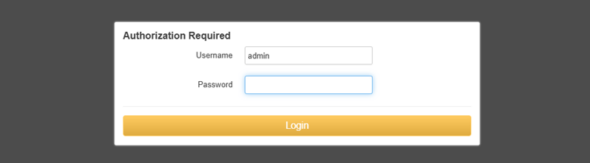
Log in using the admin username and the Wi-Fi password printed on the device label.
If the GUI does not appear, it may be because your main router does not support hostname resolution. In this case:
Access the main router’s GUI or use an IP scanner to find the CX20 device’s IP address.
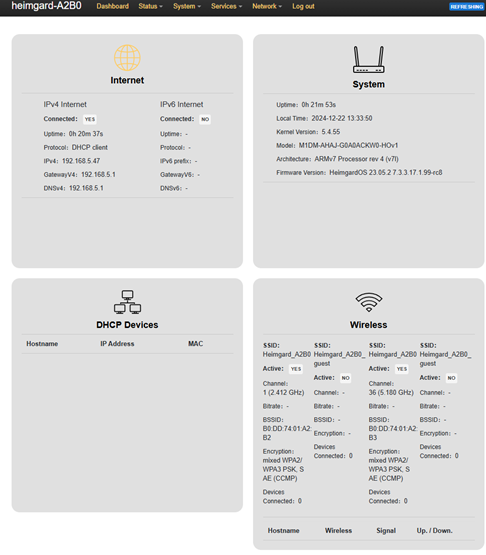
Dashboard
The dashboard is the main screen and displays key information about the device’s status, including:
Network connection: Displays the IP address.
Device information: Provides system details.
Wireless connections: Shows connected devices.
For more detailed information, click the Status tab and select Overview.
Wi-Fi Settings (SSID)
To manage Wi-Fi settings:
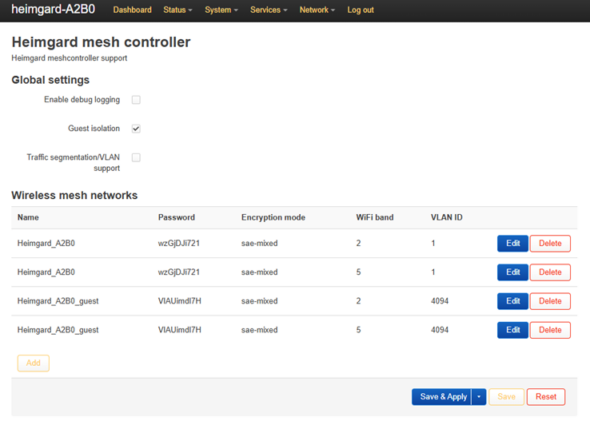
1. Click on the Services tab and select Mesh Controller.
2. A list of all configured Wi-Fi networks will be displayed.
3. Click the Edit button to change the following:
SSID name
Password
Encryption mode
Wi-Fi band
4. Click Save, followed by Save and Apply.
Note: If connected wirelessly, you may lose connection temporarily.
Important: Do not change the VLAN ID.
Configuring the Guest Wi-Fi Network (SSID)
To enable and configure a guest Wi-Fi network:
1. Follow the steps outlined above to set the SSID details.
2. Click the Network tab and select Wireless.
3. Click Enable on the Wi-Fi band where the guest network should be activated.
4. You can also edit the guest network credentials by clicking Edit and following the steps.